09 10

Monday, 29 September 2014

Fall Table Setting on a Budget

They say you eat with your eyes as much as with your stomach.  (Don't know who "they" really are, but they say that.)  And to me that not only means the look of the food, but also about the table or surroundings that you are eating in.

I like to have my table set and ready to go for any occasion, BUT I don't want to spend a lot of money doing it.

These pictures are of my current Fall table setting.  Everything was purchased from a dollar store, discount store, or grocery store, with the exception of my dishes and glassware.  It's just an example of what you can do on a budget, or by using things you already have on hand that really make an impression.

I've seen many different Fall table settings, but most of them are so elaborate and BIG, that there's no room left for the diners or the food.

What I used:
  • existing white china plates
  • existing cheese plates that have some fall colours in them
  • plain white napkins that I already had
  • square mirrored placemats 
  • silk Fall leaves from the dollar store
  • 3 ceramic pumpkins that I got from Winners
  • a few gourds & mini pumpkins from the grocery store
  • candles in glass mason jars (just to have a more "homey" look
  • mini grapevine wreaths from the dollar store
  • glass writing markers available at the Wine Shop
  • fake green apples (I already had, but you can get from Winners or the dollar store)
  • brown placemats from the dollar store
  • placecards made with cardstock, and a template I found on line


What I did for the table centre:


1) I took the 4 glass placemats and put them together in the centre of my table to be a base
2) Placed the ceramic pumpkins around, then the jars.
3) I then scattered the leaves around, then placed the apples, gourds, and mini pumpkins.


What I did for the place settings:

1) Put placemats at each place
2) Placed dinner plate on top,
4) Placed small cheese plates on top.
5) Glued a few leaves to the mini grapevine wreaths to create napkin rings
6) Folded and fanned the napkins in the rings.
7) Printed, cut, and folded the placecards
8) Took glass writing markers and wrote a thanksgiving message on each wine glass.
9) Placed mini pumpkin at each place.
10) Took leaves that were stuck 2 together and place on the stem of the wine glass.


Sunday, 28 September 2014

Quick & Easy Meatball Bocconcini Appetizers


I created this quick & easy appetizer for a dinner I was hosting and didn't want to do something that had to be heated beforehand.  Since it is a cold app, it's a great summer app, but because of the colours, it makes a great Christmas app as well.

You can either make the meatballs from scratch yourself (recipe in a previous post), or you can buy pre-made, already cooked meatballs (de-frosted first).

These always go fast.


Meatball Bocconcini Appetizers

Recipe by Fluudbloggler
Yield: 40

Ingredients
  • 20 Mini Bocconcini
  • 20 Cooked mini meatballs
  • 20 Cherry Tomatoes
  • 20 Fresh Basil Leaves
  • 1/4 cup Tomato sauce
Cooking Directions
  1. Place a small circle of tomato sauce (about 1/2 tsp each) 40 times on a large planner.
     
  2. Cut the meatballs in half.
  3. Cut the bocconcini in half, and place on paper towel to drain liquid.
  4. Cut cherry tomatoes in half.
  5. Place half meatball on the tomato sauce circles.
  6. Pull from plant individual basil leaves.  Cutting extra large leaves in half.
  7. With a large toothpick or cocktail stick, spear tomato, then bocconcini then basil leaf, then 
  8. Spear into meatballs. 
  9.  Refrigerate until ready to use.

Mini Microwave Meatballs

Making home made meatballs is something everybody should learn.  You can use them in pasta, use as an appetizer (with some sweet & sour sauce), create other appetizers with meatballs as a base.

These are quick and easy, less messy than other methods, and they really hold their shape well.

Sorry there are no pictures, but they are easy enough to do without pictures,


Mini Microwave Meatballs

Recipe by Fluudbloggler
Yield: Approx 30

Ingredients
  • 1 pound Ground Beef*
  • 1 egg
  • 1/2 cup finely crushed crackers OR breadcrumbs
  • 2 tbsp milk
  • 1/2 tsp salt
  • 1/4 tsp garlic powder
  • 1/4 tsp pepper
  • 1 tbsp Worcestershire sauce
  • 1/4 tsp dried basil (optional)
Cooking Directions
  1. Combine all ingredients until well incorporated.
  2. Using a tablespoon measuring spoon, measure out a tablespoon of meat mixture and form into balls.
  3. Line plate with a paper towel, and place meatballs on plate (leaving 1/4" between each meatball)
  4. Microwave for 5 minutes until cooked through.
*you can also use ground turkey, or half beef/half ground pork

If you need to keep your meatballs warm, place in a slow cooker on low until ready to serve. 

Wednesday, 17 September 2014

Apple Butter

I use this apple butter to add to my pork loin sauce.  But it can also be added to BBQ sauce for ribs, or as a coating for chicken.  It can be added to a crock pot of mulled wine.  Anywhere you could use applesauce or want to add a bit of sweet buttery apple flavouring to your recipes.

The recipe below makes enough to fill a medium sized mason jar, but can easily be doubled if you wanted to keep more on hand.


Apple Butter

Recipe by Fluudbloggler
Ingredients
  • 4 medium Macintosh Apples
  • 1 cup apple cider
  • 1/2 cup brown sugar
  • 2 tsp lemon juice
  • 1/2 tsp cinnamon
Cooking Directions
  1. Peel, core and slice apples.

  2. Heat apple all ingredients over medium high heat in a saucepan.
  3. Cook until boiling and bubbling until apples are soft.

  4. Blend with immersion blender until smooth.

  5. Pour into small slow cooker for about 2 hours.
  6. Sterilize the mason jar and lid.
  7. Pour and seal apple butter into jar and refrigerate until ready to use.

Pork Loin with Apple Butter Sauce


This pork loin with Apple Butter sauce is my new favourite recipe.  I'm happy to say completely made up as I went along, but I've been able to replicate it several times, so I thought it was time to write it all down.

It's a little on the sweet side, and if you prefer yours less sweet, reduce the amount of apple butter, or use unsweetened applesauce as a substitute.

The pork turns out lovely and tender and the sauce is extremely yummy, and I hope it becomes one of your favourites as well.  Enjoy!


Pork Loin with Apple Butter Sauce

Recipe by Fluudbloggler
Ingredients
  • 2 pork loin chops
  • 1/4 cup onion finely chopped
  • 2 cloves garlic
  • 1/4 cup mushrooms finely chopped
  • 1 cup chicken stock
  • 1/4 cup dry sherry
  • 2 tbsp dijon mustard
  • 1/2 cup half & half cream
  • 2 tbsp olive oil
  • 1/4 cup Apple Butter (home-made or purchased)
Cooking Directions
  1. Heat oil in heavy bottomed pan.
  2. Brown pork loin until nicely browned on both sides.

  3. Place pork loin in a baking dish, and continue cooking in a 350 degree over (for about 15 minutes).
  4. While pork is cooking, start sauce.
  5. Heat olive oil in the same pan and saute onion and garlic until soft over medium high heat.
  6. Add mushroom and cook until golden.
  7. Add chicken stock, sherry, and apple butter.
  8. Render sauce down for about 5 minutes.
  9. Slowly add cream, stirring as you add.
  10. Reduce heat to medium low, and return pork loins to the pan.
  11. Cook in sauce another 5 minutes.
  12. Slice pork loins, and add to sauce for further couple of minutes.
  13. Spoon sauce onto plates and add slice pork loin on top.

Monday, 8 September 2014

Easy No Fail Banana Bread

I was asked today for a good banana bread recipe. The one I'm posting here has always been a no fail.  It's good with either added walnuts or even chocolate chips for those with a chocolate addiction such as myself.

I haven't posted step by step instructional pictures this time as it's such an easy recipe, you don't really need them.


Banana Bread
Recipe by Fluudbloggler

1 3/4 cups flour
2 tsp baking powder
1/2 tsp salt
1/4 tsp baking soda
2/3 cup sugar
1/3 cup shortening
1 egg
2 ripe bananas (mashed)
1/2 cup walnuts or chocolate chips (optional)

Mix all ingredients together with a hand or stand mixer until well incorporated.

Place in loaf pan and bake at 350 for 1 hour.

This recipe can also be made into muffins, but they are a little more dense than regular banana muffins.

Ricotta cheese made simple


Sometimes making something fresh from home-made is not particularly "cost effective" meaning it can be either cheaper or at least the same cost just buying from the store.  But as someone who loves to cook and experiment, sometimes it doesn't matter to me.  I just want to make it myself.

This is how I felt about my recent experiment in making ricotta cheese from scratch.  It was pretty quick and easy, but once I bought the whole milk (something I don't usually keep in the house), and the heavy cream (something I usually keep in the house, but on this particular day I didn't have), I probably could have just bought a tub. If you want to try this yourself, you will also need some cheesecloth you will have to buy this as well, but it is very inexpensive, and a little goes a long way.

This is very simple to do, and it really is creamy and delicious.  I wanted to make some to add to a ravioli filling I was making (see next blog for recipe).


Home-made Ricotta Cheese
Recipe by Fluudbloggler

4 cups whole (3%) milk
2 cups heavy cream (whipping cream)
1/2 tsp salt*
3 tbsp white vinegar**

Prepare your cheesecloth by placing a fine strainer over a bowl, and line with two layers of damp cheesecloth.

Place milk and cream and salt in a pan on medium high, and heat until boiling, stirring now and then to avoid burning.


Remove from heat and add vinegar.
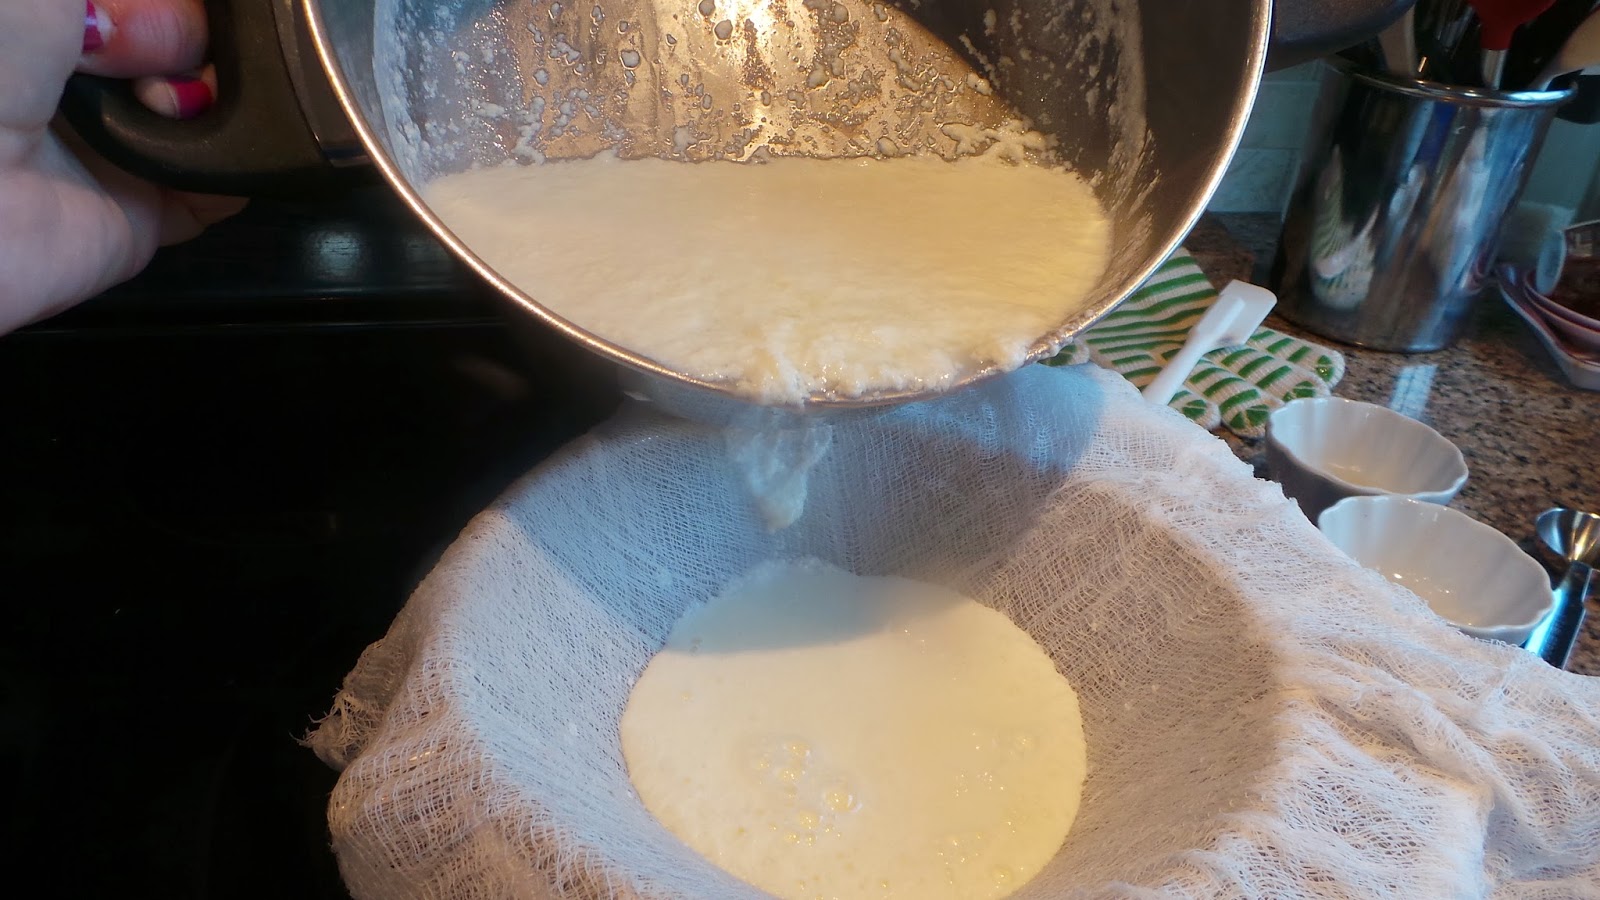
The milk mixture will start to curdle.  Leave for about 2 minutes, stirring a couple of times.  You should see bigger clumps forming.

Pour into cheese cloth and let drain.


 Let it drain for about 2 hours, and now and then slightly squeeze the cheesecloth to get as much liquid out as much liquid as possible.

Discard the liquid in the bowl.  Scoop out the cheese from the cheesecloth and place in a bowl in the fridge.  It is ready to eat after it's slightly cold.  I can be kept in the fridge for 3-4 days.

*Other recipes suggest Kosher salt.  Regular salt is fine.
**Other recipes will call for lemon juice or white wine vinegar.  I've had more success using regular white vinegar.